If you have made changes to your website in WordPress, but you cannot see them rendered on the site when accessing it, you might be dealing with a caching issue. When such an issue is encountered, the most common piece of advice is to simply clear the cache. Hosting servers, browsers, and caching extensions all typically leverage caching functionality, so it is not at all unusual when cached files are the source of this type of issue.
Because multiple readers have inquired about how exactly that can be done, we decided to put together this helpful document that will address browser caching, web hosting cache, as well as dealing with WordPress caching plug-ins, and most importantly how to clear this cache in order to see any updated changes made to your WordPress project.
We offer this website completely free to our visitors. To help pay the bills, we’ll often (but not always) set up affiliate relationships with the top providers after selecting our favorites. However, we do our best not to let this impact our choices. There are plenty of high-paying companies we’ve turned down because we didn’t like their product.
An added benefit of our relationships is that we always try to negotiate exclusive discounts for our visitors.
What Is Cache (And When To Clear It)
When a site loads, many PHP scripts are run. While each of these is quick to process, the total time it takes for them to execute can add up to a time-consuming lag. To avoid it, the concept of caching, or storing a static version of a website, is applied to retain certain elements which do not need to be reloaded every single time a website is rendered. Therefore, caching is a mechanism used to boost the speed of loading a website.
Caching solutions come in multiple forms. With WordPress, caching plug-ins like WP Super Cache and WP Rocket include a setting that dictates what gets cached, how long to keep the cached content around, and offers the ability to clear cache on-demand.
Plug-ins are not the only way to go of course. Managed WordPress Hosting options like WP Engine offer offer built in caching tools. And you can improve WordPress security and performance with firewall web apps like CloudFlare and Sucuri. It's also worth mentioning that nearly every contemporary web browser leverages caching to store files on your PC and to improve speed.
Caching allows content that is usually unchanged to remain stored off in order to be pulled in when a website is rendered, saving loading time in the process, resulting in a faster website for user navigation and a more optimal user experience. However, the trade-off to the convenience of such a mechanism is that when those typically static aspects of the site are altered, using cached data results in cached (outdated) versions to display. In this case, the website needs to load these components fresh, which means the cache needs to be cleared.
Now, let's talk about some methods of clearing cache.
Clear Cache in WordPress
Step 1: Clear Browse Cache
As noted earlier, browsers store components from websites (including JavaScript, images, and stylesheets) in the local cache to have them more quickly rendered upon the website’s access. But these browsers may not always recognize the last time the page was updated against when the cache was stored, so when the site is accessed the components are pulled from the computer’s cached storage instead.
To clear browser cache, the following steps need to be taken:
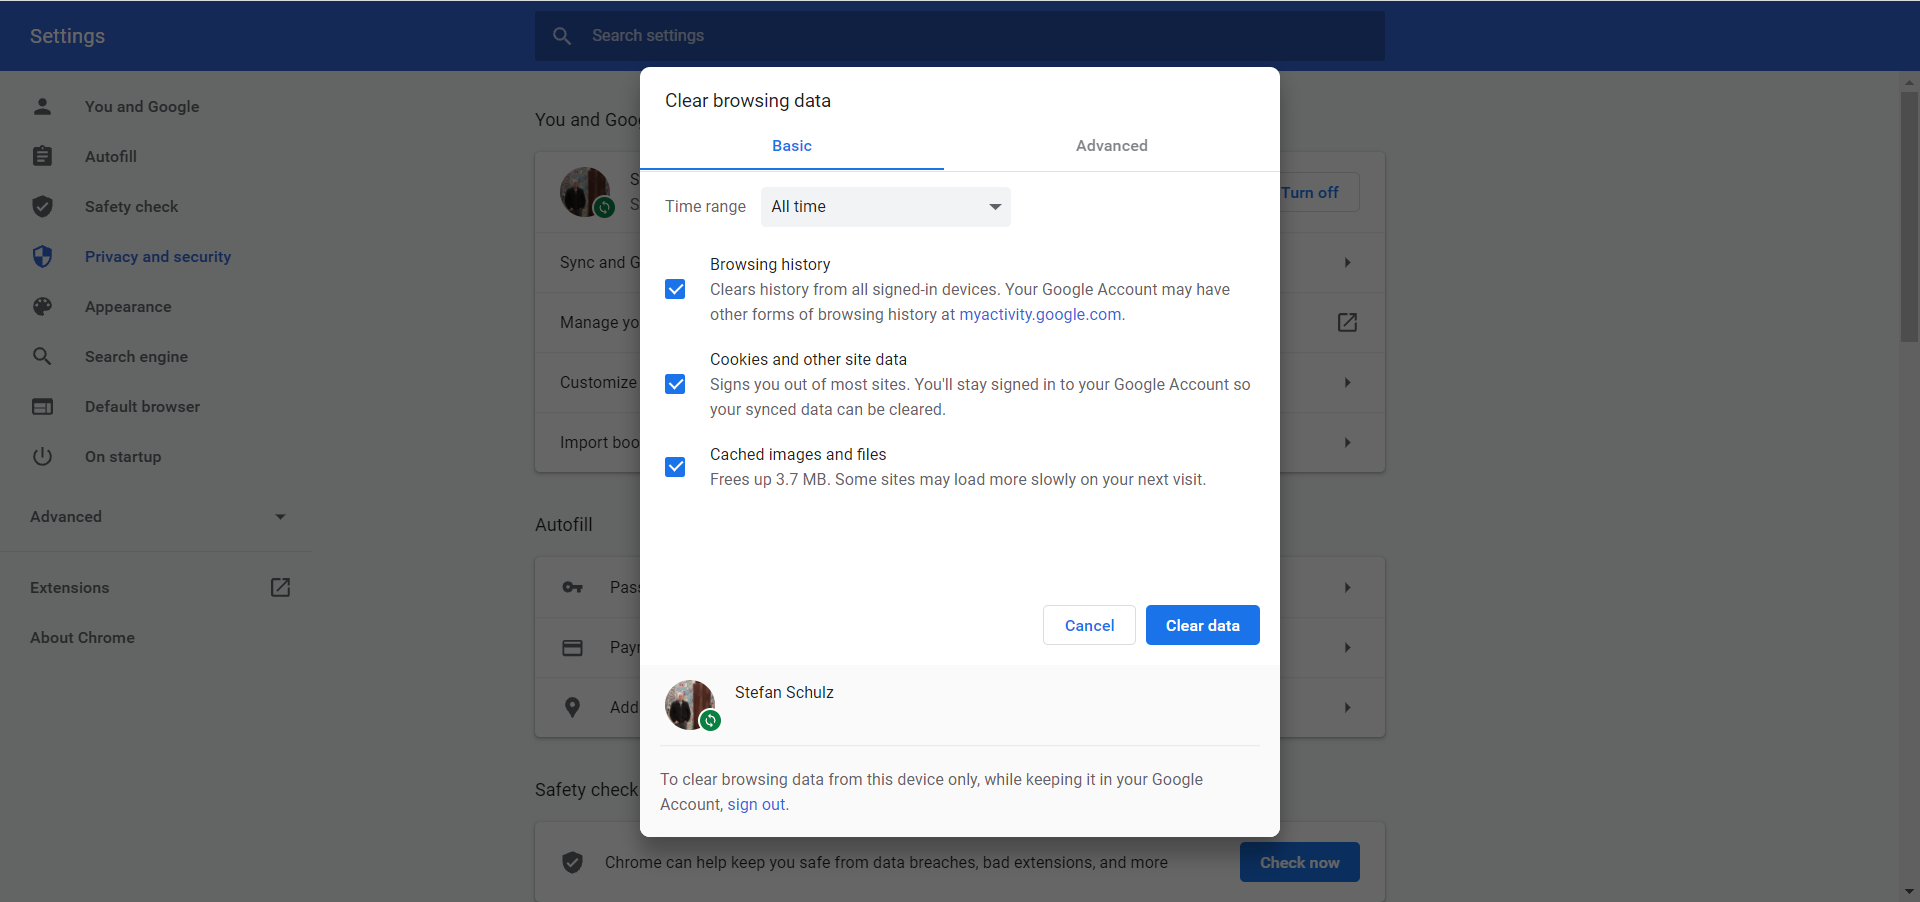
- Find the vertical ellipsis (triple dot) icon at the top of the browser and click on it for the browser menu.
- Find the More Tools option, and select Clear Browsing Data from the submenu that displays off of that.
- A pop-up with a set of checkboxes will appear that will allow you to select which cached content you want to clear.

- Assure that the boxes next to Clear images and files as well as next to Cookies and other site and plugin data have checks next to them.
- Next, click the Clear browsing data button on the bottom of the popup.
That's it! The browser cache has been cleared. Now, try launching your website to see if your recently updated changes have taken effect.
If your site still isn’t reflecting your recent changes, let's try clearing your WordPress caching plugin.
Step 2: Clear Server Cache
If you are utilizing any WordPress caching plugins, the next step is to clear the plugin cache. This is easily done with most plugins from the Settings menu. Let's take a look at the three most common WordPress caching plugins and how to clear cache from them.
Use a Caching Plugin
- WP Rocket is one of the most popular caching plugins for WordPress because it offers every user a cached version of the site in order to expedite site access. Clearing this cache is as simple as one click.
- In the Settings from the WP Rocket page, simply click the Clear Cache button and all of the caches from it will be cleared.
- WP Super Cache is another popular plugin that allows for single-click removal.
- From the Settings Menu’s WP Super Cache menu simply click the Delete Cache button under the Delete Cached Pages
- W3 Total Cache is another plugin with a one-click cache clearing ability.
- This can be done from the Performance dashboard where you can just click the empty all caches button to clear the plugin’s cache.
Use a Managed Hosting Solution
WP Engine
Some users prefer not to use plugins, and instead use a managed WordPress hosting solution like WP Engine. From the WordPress admin area you can clear cache simply with the following steps:
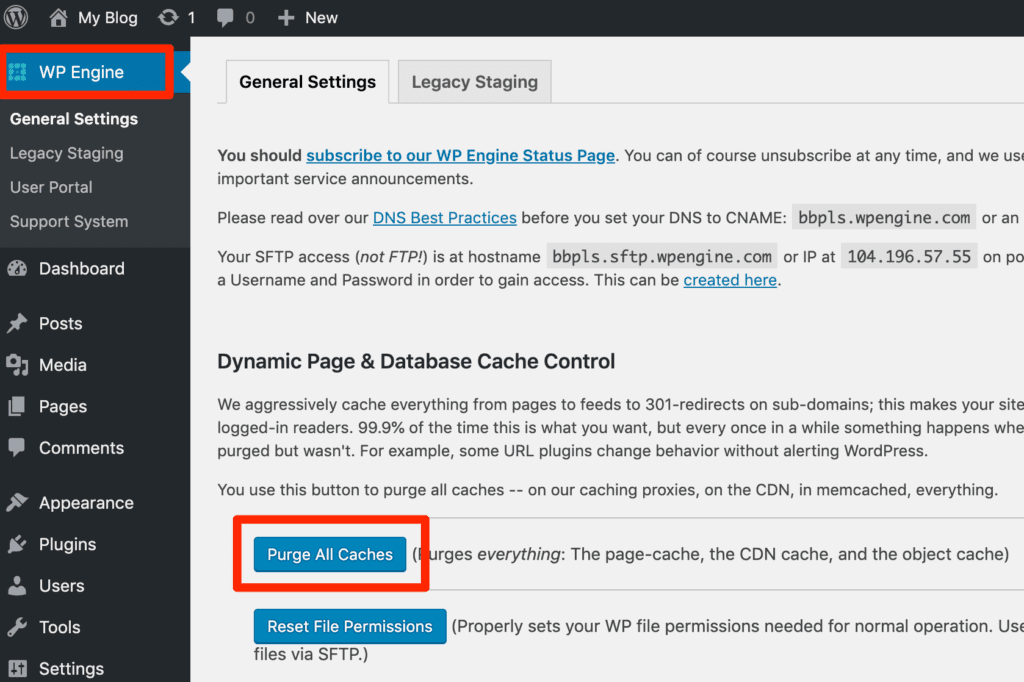
- Locate the WP Engine item on the admin menu.
- Find the General tab.
- Click the Purge all caches button.
Bluehost
Widely regarded as one of the best WordPress hosting solutions is Bluehost which leverages caching to improve the speed and performance of their hosted sites as well. The cache is easy to clear from Bluehost’s cache reserves as well. To do so:
- Log in to your WordPress dashboard.
- Select Bluehost from the left-side menu and select Settings.
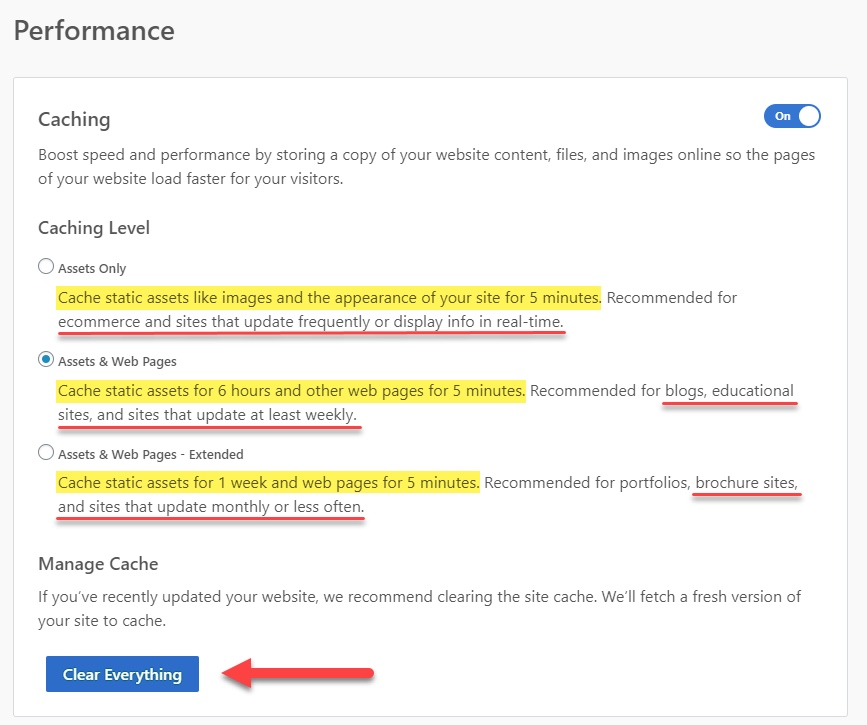
- Scroll down to the bottom until you see Performance.
- Hovering the cursor over it will reveal a couple of caching options including Clear Everything.
- Select this option to have Bluehost purge all of the relevant cache files.
SiteGround
Similar to Bluehost, SiteGround is another popular web hosting solution renowned for its excellent customer support and site speed, that offers caching as a way to expedite site rendering upon access. This host allows for two methods of cache clearing.
1st Method
- From the hosting account’s dashboard locate the Speed menu item under site tools and choose the Caching option under it.
- Several tabs will become visible. Click over to the Dynamic Cache.
- Locate your domain name on the domain listing, and click the icon next to it. This will display certain actions, and you will want to select the Caching.
2nd Method
- Install the WordPress plugin called SG Optimizer.
- Once installed, find the Purge SG Cache on the admin toolbar to clear the cache.
Security Solutions
Sucuri
Many users utilize a WordPress firewall, of which Sucuri, is the most popular. These applications have their own firewall layering and can also have their cache cleared.
- Login to the Sucuri plugin and access the dashboard.
- Under the Firewall (WAF) tab there will be several subtabs, one of which is Clear Cache
- Accessing this tab will display a button that reads Clear Cache. Click this button to purge the system’s existing cache.
Summary
Hopefully, this article was a helpful and detailed guide to cache clearing in order to speed up your site. If you are interested in more tips for optimizing your site, check out some information about boosting your site’s performance and speed.